Self Learner | Information Technology Enthusiast | Hamba Allah

My photo
Pribadi yang berdzikir itu : kalau bicara, bicaranya dakwah, diamnya berdzikir, nafasnya tasbih, matanya penuh ramat Allah, telinganya terjaga, pikirannya baik sangka, tidak suka sinis, pesimis dan tak suka memvonis. . dia tidak sibuk mencari kesalahan orang lain dan asik memperbaiki dirinya . . (Ust.Muhammad Arifin Ilham)

Showing posts with label IT Networking. Show all posts

Thursday, July 21, 2016

Menjalankan Multiple Profile OpenVPN di Windows


Untuk menjalankan beberapa profile OpenVPN dalam waktu yang bersamaan memiliki kendala pada TAP-Adapter nya, dimana setiap session tunnel OpenVPN menggunakan 1 TAP-Adapter, sementara jika kita menginstall OpenVPN di Windows maka secara default akan terinstall hanya 1 TAP-Driver saja.
Maka, untuk dapat menjalankan beberapa profile OpenVPN sekaligus dalam waktu yang bersamaan dibutuhkan jumlah TAP-Driver sesuai jumlah profile yang diinginkan.
Dalam kasus ini, saya membutuhkan 2 profile OpenVPN yang harus dijalankan bersamaan, maka existing sudah terdapat 1 TAP-Adapter selanjutnya hanya tinggal menambahkan (meng-install) 1 TAP-Adapter lainnya.
Berikut langkah-langkah untuk menambahkan (menginstall) TAP-Adapter pada Windows 7:
  1. Buka icon windows, dan ketikkan CMD atau command prompt:
Atau juga bisa dengan membuka “Run” dan ketikkan “cmd”

  1. Apabila sudah muncul hasil pencarian dari cmd, maka klik kanan pada command prompt dan pilih “Run as administrator”

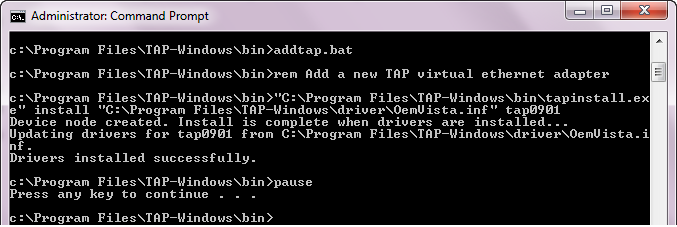
  1. Masuk ke direktori C:\Program Files\TAP-Windows\bin, dan jalankan file “addtap.bat”
C:\Users\donny\AppData\Local\Temp\SNAGHTML100f0d8.PNG
Apabila muncul alert, maka klik allow untuk mengizinkan proses instalasi TAP-Adapter baru, tunggu sebentar sampai proses instalasi selesai yang ditandai dengan pesan “Drivers installed successfully”.
Silahkan di-check sekarang TAP-Adapter sudah terlihat muncul 1 TAP-Adapter baru.
Sampai tahap ini sudah selesai, dan kini sudah dapat menjalankan 2 Profile OpenVPN sekaligus dalam waktu yang bersamaan.
Jika dibutuhkan untuk menjalankan lebih dari 2 profile sekaligus (misalnya: 4 profile) maka tinggal lakukan saja instalasi TAP-Adapter selanjutnya menggunakan langkah yang sama sebanyak yang dibutuhkan.

Thank you.
Donny Achmadi


Tuesday, August 11, 2015

How to export file (IOS/log/Crash info/etc) from Cisco with FTP


1.   Install FTP Server on your PC’s/Laptop

For this section, for me I would prefer using Filezilla as HTTP Server due to this software is the one light and simpler than another apps.

Let Download Filezilla server and install on your PC’s or Laptop. Then start Filezilla server interface


Create credential username and password with folder which you wish to shared (for this example username: cisco, password:cisco and with local drive D:\)


Check and note IP address of your PC’s or Laptop, and make sure you are on 1 subnet from Management interface of Cisco Router.


2.   Configure FTP on Cisco Router

Access your Cisco Router either via SSH, Telnet or Console and make sure you have privilege to change configuration.
Run these command :

Cisco-ASR# configure terminal
Cisco-ASR(config)# ip ftp source-interface GigabitEthernet0 
Cisco-ASR(config)# ip ftp username cisco
Cisco-ASR(config)# ip ftp password cisco
At this section, Gigabit Ethernet 0 is Management interface of Cisco Router ASR which have the same subnet with your PC’s/Laptop, and ftp username/password is cisco related with credential created in filezilla server before.


3.   Export file from Cisco Router to Laptop (windows)

Determine name and location of file you want to exported.
For example, I want to export file Crash info of Cisco Router with name:
kernel.rp_20150808225939.core.gz and located at directory bootflash:core/


Then copy that file into your PC’s Laptop with these command. 
(for example: IP address my Laptop is 10.10.61.173)
Cisco-ASR# copy bootflash:core/kernel.rp_20150808225939.core.gz ftp:
Fill IP address of your PC’s or Laptop, and type destination filename.

“writtng kernel …… !!!!!!!!!!” indicate that exporting is running. Sit and relax until exporting process done 


Yeeah, it success exported :)

Written by 
Donny Achmadi, CCNA, CCNP, VTSP, VCP

11 August 2015 at Menara MTH Lt.12

Thursday, January 8, 2015

Configure SSH on EdgeCore Switch (ECS4210-28T)


  1. Login to Web console of Switch with Admin account or account with network-admin user role
  2. Select “Security” Tab on the left side then choose subtab “SSH”
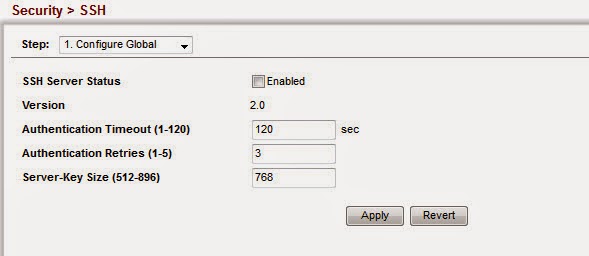
  3. There is configuration box like picture below :


  4. You cannot just thick “enabled” then apply, it will be showing “invalid Data”. So you have to generate RSA keys first.
  5.  Look at “Step”, choose 2. Configure host Key


  6. Make sure that the options are already fit with details below, Then click “Apply”


  7. SSH Generate Key in Progress, don’t perform any changes until showing pop-up confirmation box with “Success”  


  8. Back to “Step 1. Configure Global”, thick “enabled” then Apply.


  9. Done ! SSH already configured correctly and Switch can be accessed by SSH.


Written by :

Donny Achmadi
8-January-2015

Tuesday, October 14, 2014

Free WAN Optimizer appliance "OpenNOP"


If an organization want to connecting their datacenter to another site via private link, usually they will use leased line from Service Provider and they will be charged depend on how much bandwidth leased. 5, 10, 20, 50, 100 Mbps or higher so it will be affected to cost :)

The challenge is with minimum bandwidth link which leased, how they can achieve it being double, triple, quadruple or even decuple, is it possible ? ah, that is so impossible, keep in mind that money talks :D,  the value of quality is straight with value of cost.

Actually it can be reached with WAN Optimization, WAN optimization also known as WAN acceleration, is the category of technologies and techniques used to maximize the efficiency of data flow across a wide area network (WAN). In market review, there are some WAN Optimizer appliance with various vendor which has ability to optimize the traffic, the one is Steelhead from Riverbed, I think till now it’s the most popular and being a market leader in WAN Optimizater product. The big problem is that appliance so very expensive, for SMB segment the capital expenditure is unreachable.

But don’t worry, there is an opensource WAN Optimizer appliance, that is called “OpenNOP” :)  . I have tried this appliance and working on it, I think the result is not bad. Check it out !


How to Install OpenNOP
 
These are a steps which you have to take for implementing OpenNOP as a WAN Optimizer in your organization, even it used with fully mesh topology, peer to peer or client server.

Before you perform installation, please check some minimum hardware requirements below for this appliance :
  • CPU: Dual-Core
  • Memory : 1024MB 
  • Disk: 40GB
  • NIC: 10/100Mb (2 interfaces)
If you have makesure that the hardware requirements already fixed so do these steps :

1. Download iso files from https://www.dropbox.com/s/50e0qubxfctcmhq/OpenNOP.x86_64-0.5.0.preload.iso

2. Install it to your physical server or virtual machine, both are possible to do.
Do Installation steps just with follow the wizard. Just for your information, This appliance is based on OpenSUSE 12.3 version, so all command prompt must following OpenSUSE command.

3. OpenNOP already installed and login to the system with credentials : User: root / Pass: linux

4. Configure the network configurations:
  • Setting IP Address eth0 : vi /etc/sysconfig/network/ifcfg-eth0
BOOTPROTO=static
IPADDR=192.168.2.110
NETMASK=255.255.255.0
NETWORK=192.168.2.0
BROADCAST=192.168.2.255
MTU=1500
ONBOOT=yes
USERCONTROL=no
STARTMODE=auto
ETHTOOL_OPTIONS=
MTU=
REMOTE_IPADDR=
  •  Setting IP Address eth1 : vi /etc/sysconfig/network/ifcfg-eth1
 BOOTPROTO=static
IPADDR=172.16.10.1
NETMASK=255.255.255.0
NETWORK=172.16.10.0
BROADCAST=172.16.10.255
MTU=1500
ONBOOT=yes
USERCONTROL=no
STARTMODE=auto
ETHTOOL_OPTIONS=
MTU=
REMOTE_IPADDR=
  •  Setting default gateway: vi /etc/sysconfig/network/routes
 default 192.168.2.1
  •   Setting DNS (Name Server): vi /etc/resolv.conf
 nameserver 8.8.8.8 
  •  Restart networking configuration: # service network restart
And verify all networking configuration, is it any improperly configuration?, or is all configuration already working fine ? test by ping to gateway


5. Disable firewall
There are 2 steps to deactivate the firewall in OpenNOP, with “yast” or using Command. if you want using “yast” it very simple, just type “yast” enter then select “Security and users” > Firewall > then disable firewall in startup tab like in screenshoot below :


Or in another option, you can turn-off the firewall with just typing this simple command :

# /sbin/SuSEfirewall2 stop           (option start/stop/status)

Whatever step do you want to take to activate it, all of them are effective to do.


6. Enable IP Forwarding
Each OpenNOP instance is running as a gateway in topology for every hosts behind it which would to be optimized. IP forwarding needed to enabled for make the connection/traffic from host able to goes through over this appliance.

For enable ip forwarding just using simple command below:

First step is checking is the IP Forwarding already activated or not by enter command :
# sysctl net.ipv4.ip_forward   
if the result is “net.ipv4.ip_forward = 0” which means that IP forwarding not active yet and you have to enable it using this command:
# sysctl -w net.ipv4.ip_forward=1
Then the result will be showing “net.ipv4.ip_forward = 1” which means that IP Forwarding successfully activated

7. Upgrade Appliance
My experience in the LAB stuff, OpenNOP installer from this source isn’t working due to need to be upgraded, so we have to upgrade this appliance first with following steps :
  • run: # zypper install perl
  • run: # zypper install glibc-locale
  • run: # zypper refresh
  • run: # zypper dup
  • run: # reboot
8. Install dependencies module
And we need to install additional software to this appliance, just install it with following run steps:
  • run: # zipper install libnfnetlink-devel
  • run: # zipper install libnetfilter_queue-devel
  • run: # zypper install libnl-devel
 9. Start OpenNOP Service
For the first we need to setup and start the kernel module before starting service with the command below :
# service opennop setup
# modprobe opennopdrv
# service opennop start
Now we get OpenNOP already running in our appliance and also with Optimization traffic which through over it.

To Stop OpenNOP service just enter commands:
# service opennop stop
# rmmod opennopdrv
 10. Verify
Let we verify that OpenNOP service was running on the appliance.


Ok, Have a lot of fun :)

Donny Achmadi,
(14 October 2014)

~ Spending my boring time ~